Lining Up Drummer With Track in Logic Pro X
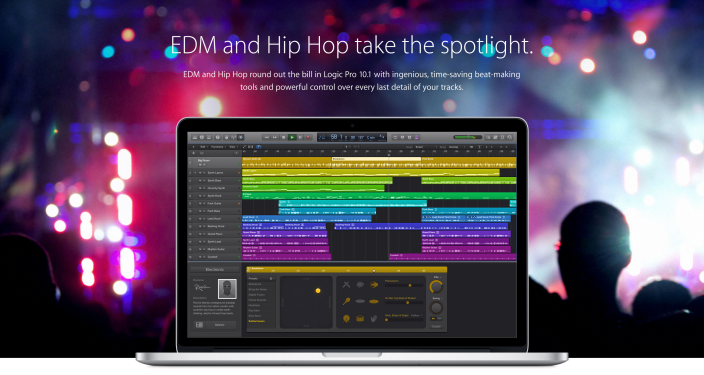
In this week's episode of The Logic Pros, we wanted to dive deeper into Logic Pro X's Drummer. Considered by many to be a tool for kids, amateurs and even the lazy, Drummer is a much more versatile and customizable feature than you may think. In fact, I would argue it might be one the most interesting and powerful additions to LPX, not to mention one that Apple just hands out for free.
Whether its the slightly embarrassing drummer names or the preset stigma that surrounds it, Drummer tends to be overlooked and, in my opinion, quite underrated. Today we will be taking a closer look at what this feature has to offer, along with how to customize the drummers and the parts they play to work with our original compositions and ideas:
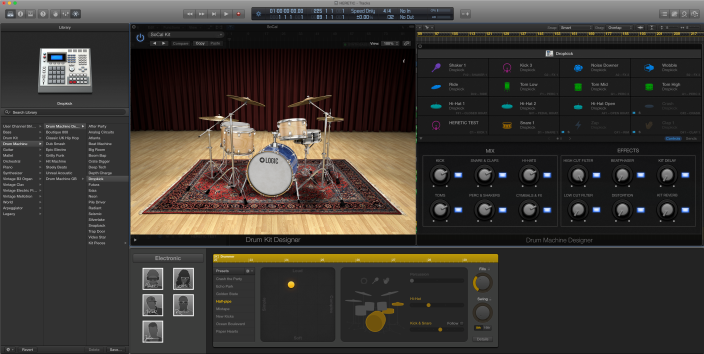
Drummer comes in the form of a new track type in LPX consisting of quite a complex series of preset routing, mix busses and more. Thankfully, Apple has done all of the work for us, automatically loading up the goods, which is very much the same as the way a professional recording engineer would track, mix, and generally work with a drum kit in the studio (seen below). Once a Drummer track is loaded we can select through a pretty wide range of music genres and drummer types to meet our specific creative needs, including a slew of new EDM/Hop-Hop Drummers in the latest 10.1 update. Even further, each Drummer has a number of options including different sounding drum kits and as many as 8 different preset starter patterns. You might consider these presets the different grooves or styles that the particular drummer plays.

A new, sort of adaptive audio region is placed on your arrange page automatically, according to the genre and drummer selections you make. The Drummer UI provides us with a number of controls that we can alter on-the-fly to create varying drum patterns for our projects on a region by region basis. This allows us to tweak the controls of the Drummer for each region to create different sections for our compositions. Double click a region on your Drummer track on the arrange page to view its Drummer controls.
On left side of the Drummer UI, next to the preset grooves, we can see a large X/Y pad that allows us to alter what the drummer is playing at any given time, from very soft and simple, to loud and complex, and everything in-between. We also get options as to which drums/cymbals/percussion in the kit are included in the rhythms, as well as swing rate and drum fill frequency controls. Hitting the "Details" button under the Swing control will reveal more information about the complexity of how each piece in the kit is played, allowing us to further customize the drum parts in our composition. For example, if you don't want the hi-hats to ever get too busy, you can set a min-max level to keep them in control.

Depending on whether you choose a live drum sound or an electronic one, the sounds are sourced from either Drum Kit Designer or Drum Machine Designer, both of which are fully editable in their own right. You can access the Drum Kit/Machine Designer via your Drummer track's channel strip in the usual "Input" slot, where any other audio instrument would be found. In both cases there are various controls that allow us to shape the tonal quality of each of the pieces in our selected drum kit. To be more specific, in the case of the Drum Machine Designer, it is actually using Logic's Ultrabeat drum sampler/synth to source the kicks, snares, hats and more.
Again, the cringeworthy names and descriptions that come with each of the preset Drummers certainly don't help. But as you can see, there are a plethora of advantages to using the feature and a number of ways to customize the drum parts, sounds and more. But it doesn't stop there. What if we want to get dig down past the macro level to edit each individual drum hit in a given pattern? I often times found myself coming up with drum parts using Drummer that were very close to what I wanted, just with a few hits here and there out of place. Another issue was when I wanted to use my own drum samples for a certain part (i.e. using EXS 24 to source the snare part's drum sample).
But have no fear, LPX has you covered. The adaptive audio regions that are created on the arrange page for drummer tracks can actually be converted into MIDI! This allows us to have full control over our drums: copying individual parts or whole sections on to other tracks/instruments, and the ability to precisely edit every single hit the pattern. Don't want that one ghost note on bar 3 beat 3.3? Just ditch it.
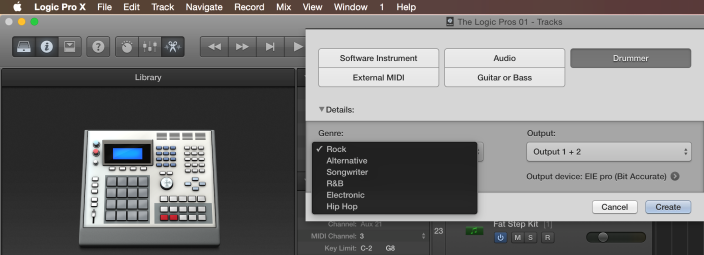
Here's how to set it up:
1. Create a New Drummer Track. Option + Command + N to bring up the new track window, or simply hit the Track option from the top menu bar.
2. Once the new Drummer track option is selected, the Drummer controls will open up along the bottom of your screen. Spend some time choosing a genre, Drummer and kit.
3. Copy the automatically created audio regions on the Drummer track to the various parts of your composition that you want them. Simply drag and drop the region while holding option on your keyboard. Then spend some time selecting a preset groove and working the controls for each region until they are sounding as close to the way you want as you can get them.
Note: Before moving on to the next step, it is a good idea to copy the work you have just done on your Drummer regions to the very end of your project for safe keeping. Highlight your desired regions on the Drummer track, then drag and drop them while holding the option key to say, bar 200 or so on your arrange page.
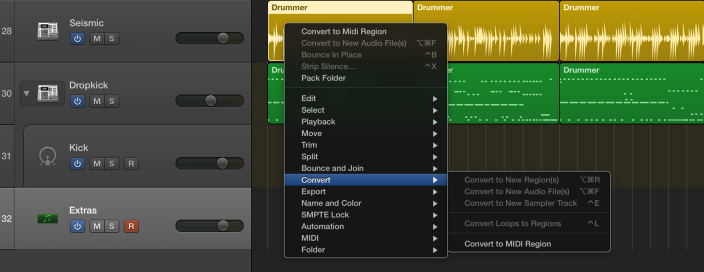
4. Right click (or control + click) any Drummer region,and scroll down to the Convert option in the pop-up menu where you'll find a "Convert to MIDI region" feature. Keep in mind, once you convert, there's no going back.
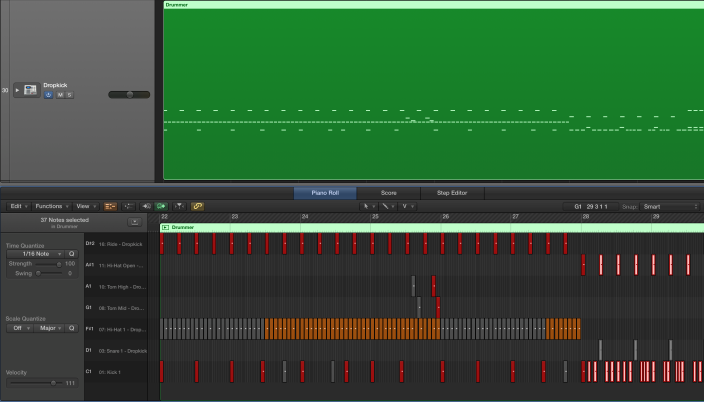
5. Now you will find your adaptive Drummer region has been replaced with a typical MIDI region on the same track, and it just works like magic within the same Stack and group busses. You won't have access to the Drummer controls anymore on converted regions, but we are still triggering the same sounds as we were before, except with far more granular editing capabilities via the LPX Piano Roll.
Note: We can have converted regions and non-converted adaptive Drummer regions on the same Drummer track, allowing us to mix and match between the two without the need for multiple drum kit tracks. It can also be convenient for auditioning new rhythms on your existing ideas or allow for really creative live performance options with fixed rhythm sections and those that can be tweaked on-the-fly.

This is what a single Drummer track looks like under the hood
The Drum Machine Designer/Ultrabeat combo is a very capable and great sounding option. If you are going to use those sounds, here's how to get the most out of them:
Head to your Drummer track on the Mixer and click the small triangle arrow along the bottom of its channel strip. This will reveal the underlying Multi-Instrument Ultrabeat running the show, giving us full mixer capabilities over each piece in the kit (including group busses). So we can simply click on the Ultrabeat instance and we have complete control over every aspect of every sound currently being used, including the ability to change any one of them to our liking!
For those that may not be as advanced as others, here's another way to change the individual kit piece sounds: Right click on any pad on the Drum Machine Designer UI to reveal the "Create Track" option, from there a new track will be created along the left side of your arrange page (within that Drummer's Stack) representing the particular drum you chose. Highlight that track and you will automatically be presented with a number of alternate sound options for that particular kit piece in Logic's library.
All told, Drummer can be as simple or as complex as you make it. Advanced users can even take it a few steps further, altering the routing within the Drummer Stack to create customized group busses, side-chains and more. And beginners can simply load up a Drummer and start rocking out in 2 seconds flat: just push play and go nuts. It can also be a very helpful tool when it comes to podcasting and other musical endeavors, allowing users to quickly get genre specific, professional sounding drum tracks in the blink of an eye, without spending any more than LPX's (unbelievably) affordable price of entry.
If you have found any interesting tricks and creative ways to use Drummer in your compositions, feel free to let us know in the comments. Also, if you're having any issues with Drummer or anything Logic related, hit us up below and we'll see if we can help get to the bottom of it.
The Logic Pros is a new regular series exploring all of the most interesting gadgets and software for making music on your Mac/iOS devices. If there is any gear you would like us to take a closer hands-on look at, let us know in the comments section below or shoot us an email.
More The Logic Pros:
- 6 powerful new features you may have missed in Logic 10.1
- How to control anything in Logic using your hardware MIDI controller
- How to create multi-layered synth patches & drum sounds with Track Stacks
- Turning iPad into a virtual pedalboard using Logic Remote
- TE's new pocket-sized synths & how to sync them up with your Mac
FTC: We use income earning auto affiliate links. More.
Check out 9to5Mac on YouTube for more Apple news:
Lining Up Drummer With Track in Logic Pro X
Source: https://9to5mac.com/2015/06/28/logic-how-to-drummer-to-midi/
0 Response to "Lining Up Drummer With Track in Logic Pro X"
Publicar un comentario